
伏雨朝寒悉不胜,那能还傍杏花行。去年高摘斗轻盈。漫惹炉烟双袖紫,空将酒晕一衫青。人间何处问多情。 ———— 纳兰容若
最近在做骗子云,涉及到了很多方面的知识,然后拆成一篇篇的博客记录一下。这一篇主要是一些技术的细节,后续实现中将不会陈述
Impostor相关
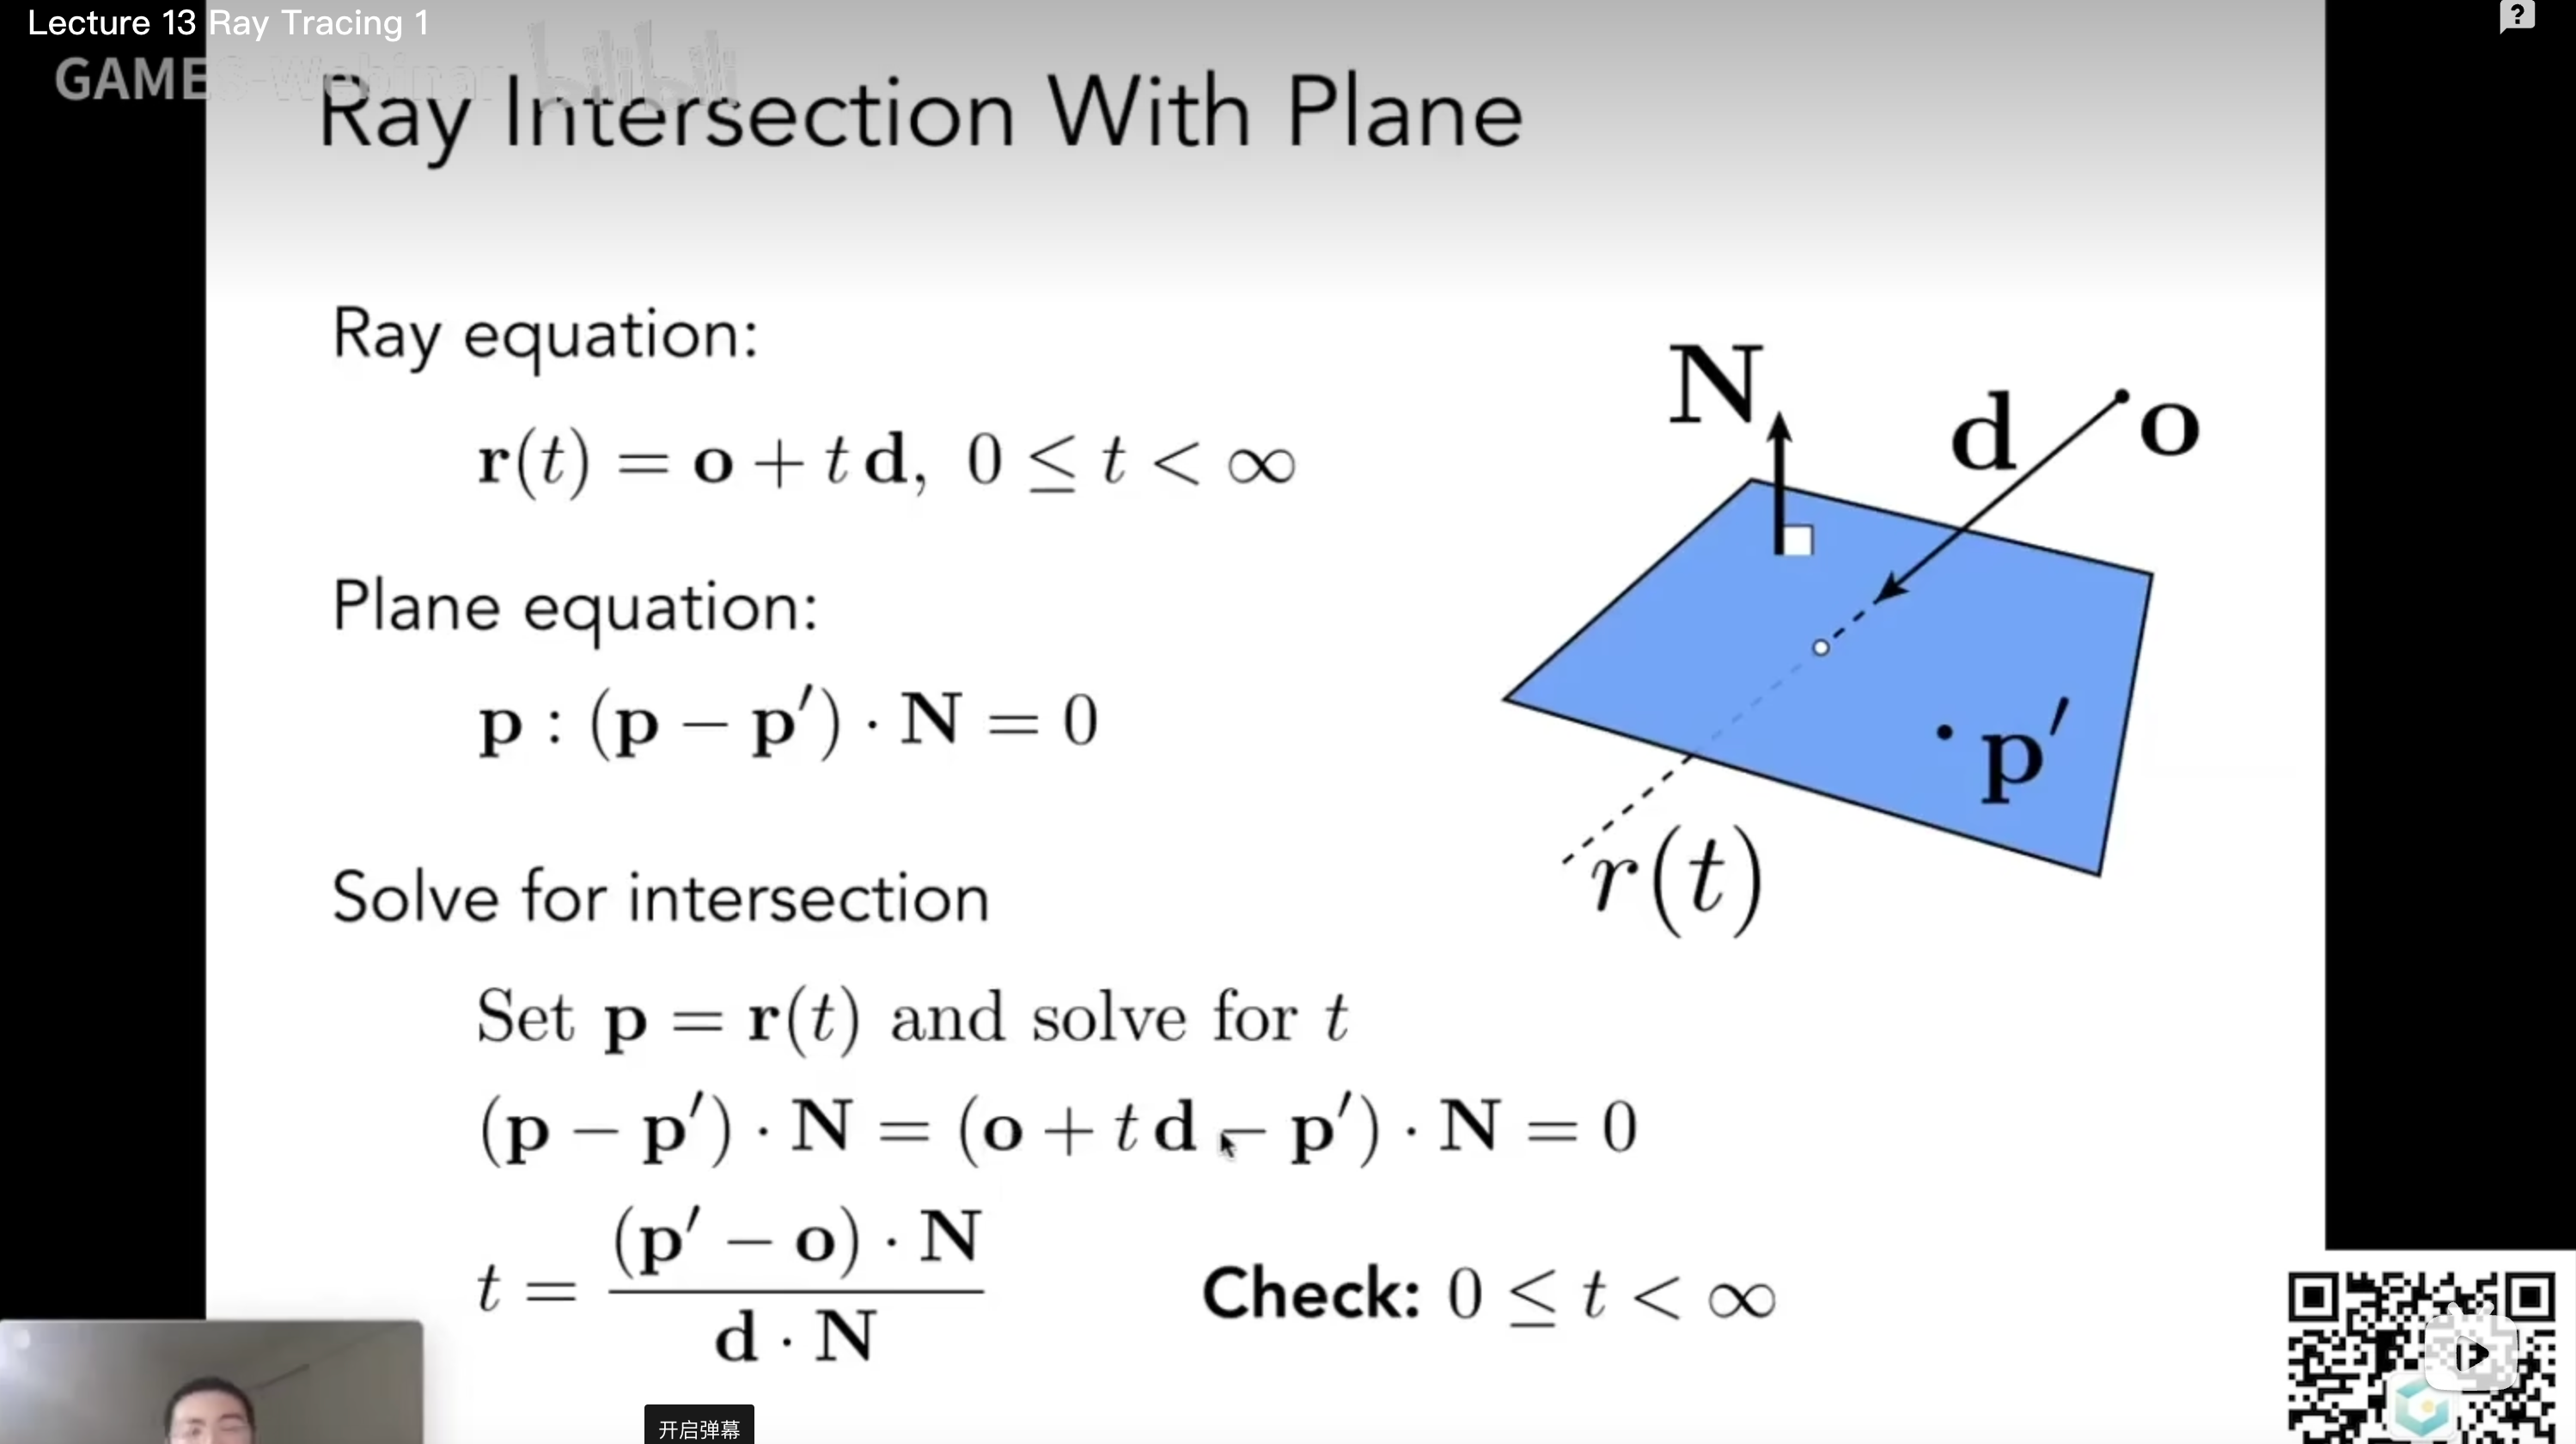
线与平面相交
射线和平面的交点(习惯了几何理解发现忘记了算术的办法解决)
设交点为t = rayorigin + raydir * k; (此时原点是在平面上的(0,0),所以交点就是一个在平面上的向量)法线和这个向量垂直所以 N dot(rayorigin + raydir * k) = 0也就是说k = -dot( rayorigin, N) / dot(raydir, N)。
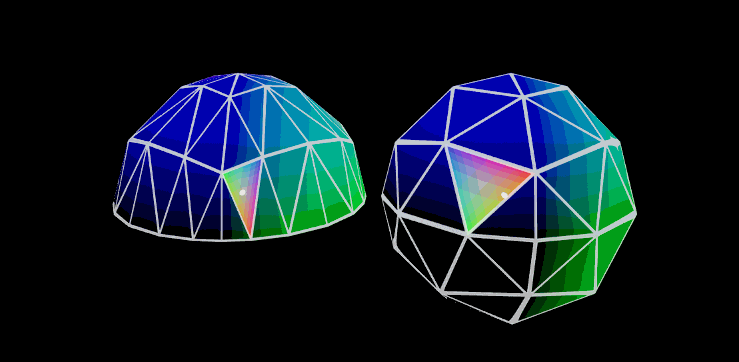
应用就是下面这个图求viewdir和对应拆出来的三个不同的面(不同的normal对应的相交面)的交点,后面点乘的步骤就是相当于转换坐标系求系数的时候的标准操作————点乘当前坐标系的xy轴
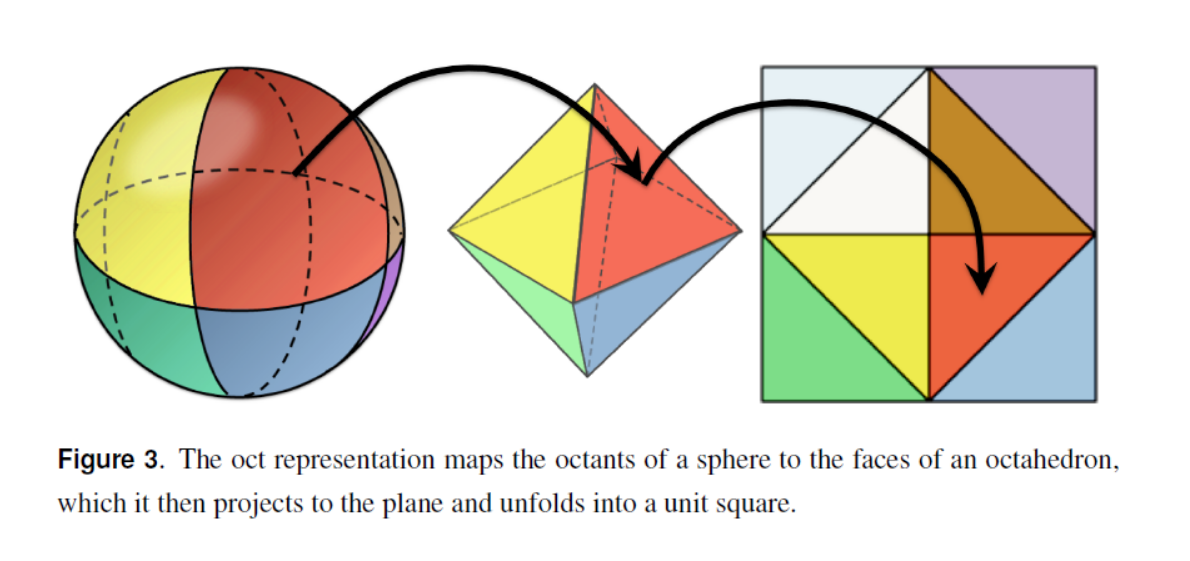
ONV
ONV的全称是Octahedral Normal Vectors,主要就是将一个球面和一个平面展开的相关关系解决
 Ryan大佬的博客上面有gif,但是并没有讲ONV的具体映射方法,在VecToSphereOct函数里面有
 vec.xz /= dot( 1, abs(vec) );,这句代码我思考了很久(大概是因为我菜)网上也找不到关于这个过程的推导,在csdn某篇文章上有人说是暴力降维近似,然后最后有个人批判了说不对但是我也没看懂,于是开始自己推导,最后用极坐标解出来了结果。比直接思考要直观很多。有了这个方法我们就可以把viewdir和平面的uv建立联系了。下面那张图就是最简单的octa(虽然这是八面体的意思)(4个面)的展开情况。
映射方法本质上是一个菱形到圆,取第一象限来说,其实就是把直线拉成了圆,只要找到拉过去的方式,里面的所有点都是符合这个拉过去的办法的(因为本质上来说就是一个极坐标的不等式)
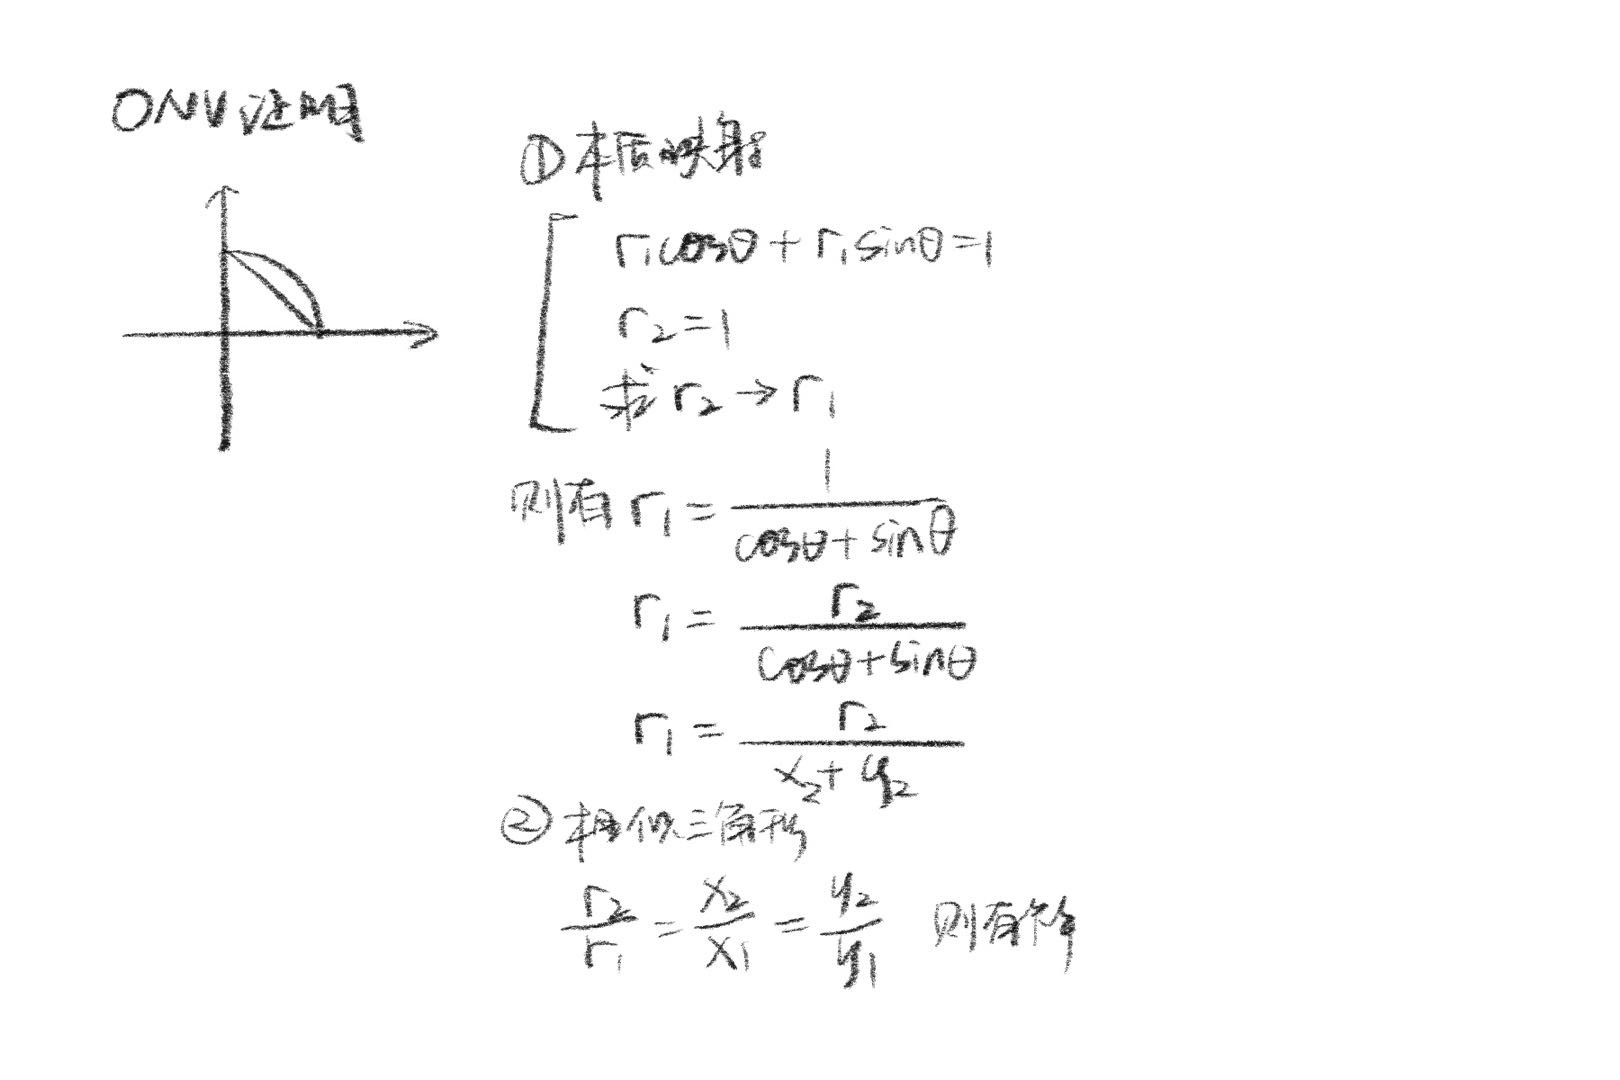
视差
之前其实就研究过这个视差贴图的原理,但之前没有自己写过,这次算是自己动手实现了一遍,简单记录一下原理。
Simple parallax
这个就是viewdir.xz / viewdir.y sampleheight scale 就为实际采样点的偏移量(一个三角函数)但是显然误差还挺大的,这个只能保证深的地方偏移远,蓝色为实际点,红色为真实偏移点。
Steep parallax
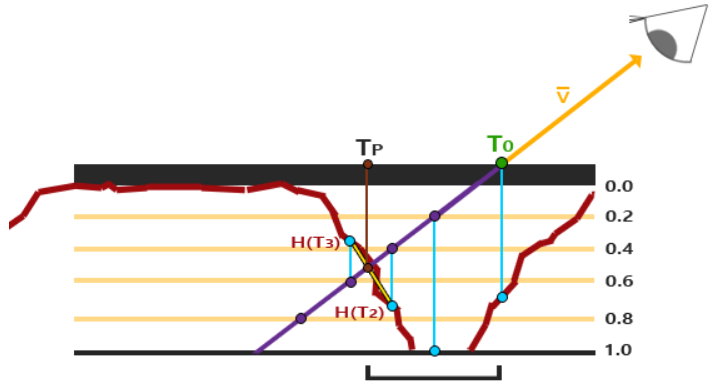 这个是把高度分成n份(当然也就是要多采样n次)从低采样深度开始采样到高采样深度,每次下降多一层,uv偏移为viewdir.xz / viewdir.y * 层深。直到采样深度比层数深度深结束采样。这样当然是精确了很多的做法
vec2 ParallaxMapping(vec2 texCoords, vec3 viewDir)
{
    // number of depth layers
    const float numLayers = 10;
    // calculate the size of each layer
    float layerDepth = 1.0 / numLayers;
    // depth of current layer
    float currentLayerDepth = 0.0;
    // the amount to shift the texture coordinates per layer (from vector P)
    vec2 P = viewDir.xy * height_scale;
    float deltaTexCoords = P / numLayers;

    vec2  currentTexCoords     = texCoords;
    float currentDepthMapValue = texture(depthMap, currentTexCoords).r;

    while(currentLayerDepth < currentDepthMapValue)
    {
        // shift texture coordinates along direction of P
        currentTexCoords -= deltaTexCoords;
        // get depthmap value at current texture coordinates
        currentDepthMapValue = texture(depthMap, currentTexCoords).r;
        // get depth of next layer
        currentLayerDepth += layerDepth;
    }

    return texCoords - currentTexCoords;
}
Occlusion Mapping parallax
这个显然就是在上面的基础上在做一个差值计算。我们得到了第一次和倒数第二次的深度,然后权重可以通过当前采样深度和层的距离,求一个相似三角形的比值(也就是上面相交点的两个比值)
vec2 prevTexCoords = currentTexCoords + deltaTexCoords;

// get depth after and before collision for linear interpolation
float afterDepth  = currentDepthMapValue - currentLayerDepth;
float beforeDepth = texture(depthMap, prevTexCoords).r - currentLayerDepth + layerDepth;

// interpolation of texture coordinates
float weight = afterDepth / (afterDepth - beforeDepth);
vec2 finalTexCoords = prevTexCoords * weight + currentTexCoords * (1.0 - weight);

return finalTexCoords;
优化策略
动态规划采样的layer数量,就是在垂直看的时候减少,侧看增加
const float minLayers = 8;
const float maxLayers = 32;
float numLayers = mix(maxLayers, minLayers, abs(dot(vec3(0.0, 0.0, 1.0), viewDir)));
当然采用了最优的视差算法之后抖动的问题还是没有完全解决————这应该是octa的必然问题吧——如果采用3frame混合的话。
资料来源
https://learnopengl-cn.github.io/05%20Advanced%20Lighting/05%20Parallax%20Mapping/ https://shaderbits.com/blog/octahedral-impostors/ http://wiki.amplify.pt/index.php?title=Unity_Products:Amplify_Impostors/Manual#Impostor_Types
Tips
作者: Ayse
fxlxlqayly2024-11-14 09:44
真好呢
kjlkinlwih2024-11-20 06:48
真棒!
nsqcqvgrlw2024-11-20 14:18
博主太厉害了!
ppcmxvxvvh2024-11-23 00:34
《卡门》剧情片高清在线免费观看:https://www.jgz518.com/xingkong/66151.html
dptgyigqlv2024-11-26 23:34
《卡门》剧情片高清在线免费观看:https://www.jgz518.com/xingkong/66151.html
luoumlxbam2024-12-02 02:46
《压力之下:美国女足世界杯队》记录片高清在线免费观看:https://www.jgz518.com/xingkong/20551.html
lfxjgfrpbo2024-12-05 04:11
《沙海漂流人》剧情片高清在线免费观看:https://www.jgz518.com/xingkong/91110.html
evusxyrexh2024-12-08 04:44
《冈仁波齐》剧情片高清在线免费观看:https://www.jgz518.com/xingkong/57817.html
pflmrdiual2024-12-08 09:29
《法式家乡菜第一季》记录片高清在线免费观看:https://www.jgz518.com/xingkong/68616.html
tivtfkcipu2024-12-16 15:23
《行将就木第六季》欧美剧高清在线免费观看:https://www.jgz518.com/xingkong/119409.html