
伏雨朝寒悉不胜,那能还傍杏花行。去年高摘斗轻盈。漫惹炉烟双袖紫,空将酒晕一衫青。人间何处问多情。 ———— 纳兰容若
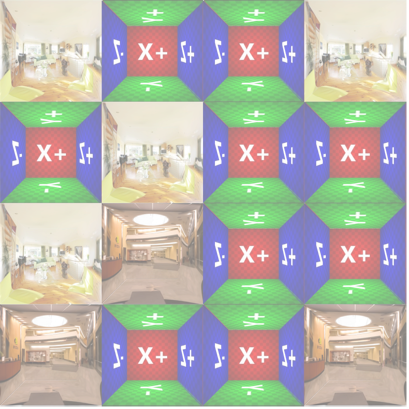
最近做了一个用于interiormapping的脚本,主要功能是将美术资源在unity里面拍照成为53度的preprojectedmap,以及将cubemap转成preprojectedmap。顺便复习了一下unity在urp/srp中管理RT的小技巧。
InteriorMapping
这一部分的内容主要参考的是清清大佬的总结,目前地平线4等等的游戏都有使用视差室内贴图的算法,而这次我做的是为preprojected投影图下去生产美术资源,这个计算方式和之前做的视差映射有一点点像,但是这个是默认了一个方盒子的采样方式,所以我们可以不需要考虑复杂的视差遮挡问题,也就省了原来为了视差准确而多几次的采样
Cubemap
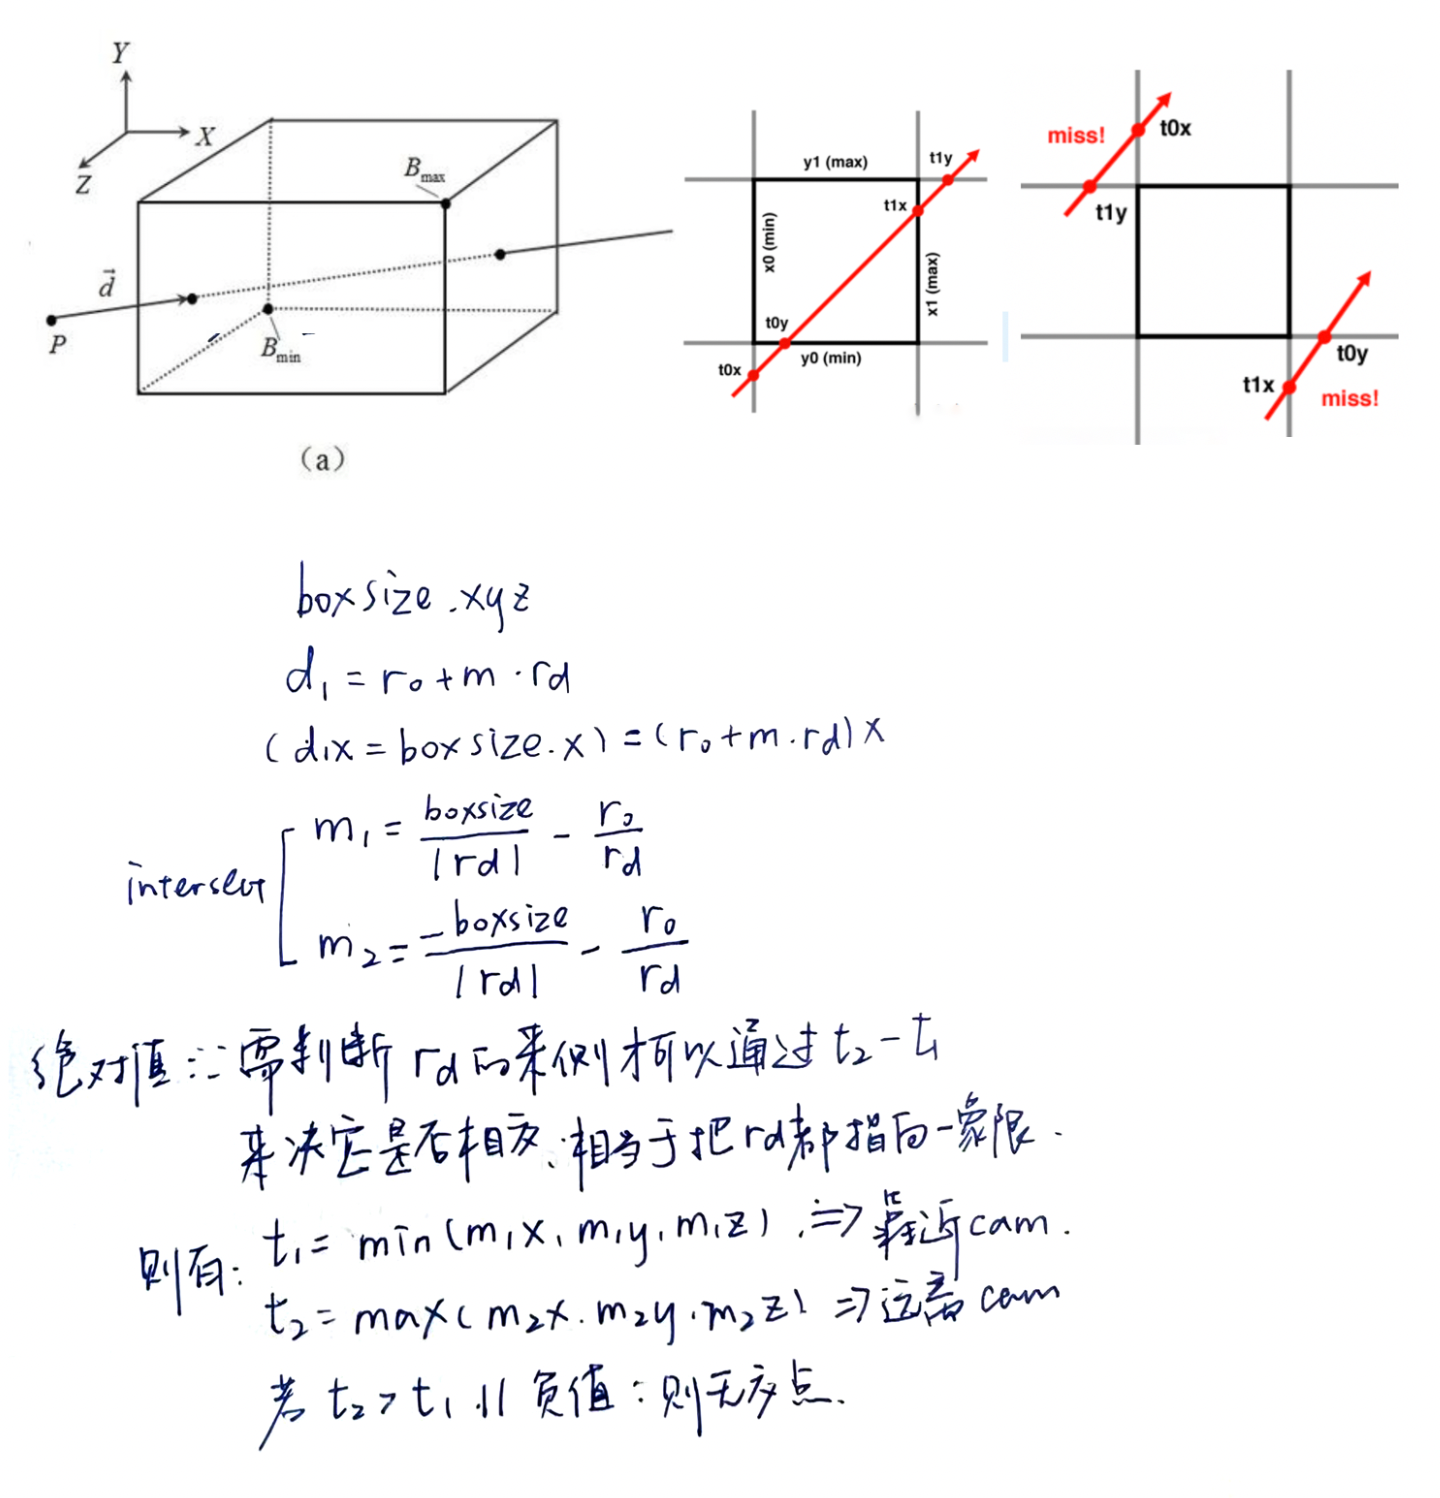
先说简单的Cubemap算法,理解简单,问题就是资源很难调整。附上一个IQ大佬的各种多边形求交的链接。我写了一下和立方体相交推导的过程,这个方法和我们在光线追踪中提到的AABB包围盒相交的原理也是一致的。
-------修正-------
RayIntersection with Axis-Align Box
今天看了一下光线追踪,发现了和这个一致的算法,关于这个算法的理解可以说是对于三维空间的方盒子,三对平面区隔(slabs)出了一堆的空间块,只有同时穿到了3个slabs的中间才算在盒体内部,出去只需要离开一个slabs就出去了。那么我们可以通过简单的比较 进入的slabs的(tmin的max)和出去slabs(tmax的min)看看有没有存在三组tmin同时存在的情况(平行不考虑)
- The ray enters the box only when it enters all pairs of slabs
- The ray exits the box as long as it exits any pair of slabs
-------修正-------
如果是cubemap的映射,只需要获得了objectspace的第二个交点的位置即可,在vert里面可以传一个位置值(或者说uv值,然后remap一下到-1到1)和objectspace的viewdir,然后在frag里这些位置值被插值后就是这个面片的采样点和viewdir,(如果有偏移和scale就在位置值上加)
o.uvw = v.vertex * _RoomCube_ST.xyx * 0.999 + _RoomCube_ST.zwz;
---
float3 roomUVW = frac(i.uvw);
float3 pos = roomUVW * 2.0 - 1.0;
//后续的相机位置可以默认为面片上的点————因为这个表面上的点是可以通过uv获得的。
切线空间只需要在这个基础上把viewdir乘上TBN到切线空间即可
 o.viewDir = float3(
        dot(viewDir, v.tangent.xyz),
        dot(viewDir, bitangent),
        dot(viewDir, v.normal));
在学习这里的过程中发现了一句很怪的代码: float tangentSign = v.tangent.w * unity_WorldTransformParams.w;这个最后要乘回算出的bitangent上。我遂查了一下,tangent.w是dcc建模的过程中就预制好的模型信息,一般模型是OpenGL平台的手相性质,然后w大概就是个标志,Unity论坛下面有以下内容
The unity_WorldTransformParams.w is a constant value of +1.0 for an entire mesh, it flips to -1.0 for the entire mesh if it is scaled so that an odd number of scale components are negative
以及Unity导入模型的时候会丢掉原有的binormal来重新算
Unity throws away the actual binormal and encode the cross direction in the tanget's w component
然后unity_WorldTransformParams.w,一般为1,当scale为负奇时为-1。最后Bitangent在计算的时候乘上他们就没错了。
Preprojected
这里自己手推了一遍代码,一开始陷入了僵局,因为在重映射的地方出现了一些理解的偏差,重映射本身不是简单的乘积拉伸,而是投影变换,所以只能用相似三角形来解,一开始解决的时候扣着交点变换到x段的分段函数上没放下。导致一直都没有做出来和大佬代码里一样的结果(虽然也有类似的拉伸感) 整了很久都没有进展,然后突然想到这里的映射理论上是一个投影变换,也就是像下面这张图一样。类似我们在光栅化的时候要求的深度值的变化问题
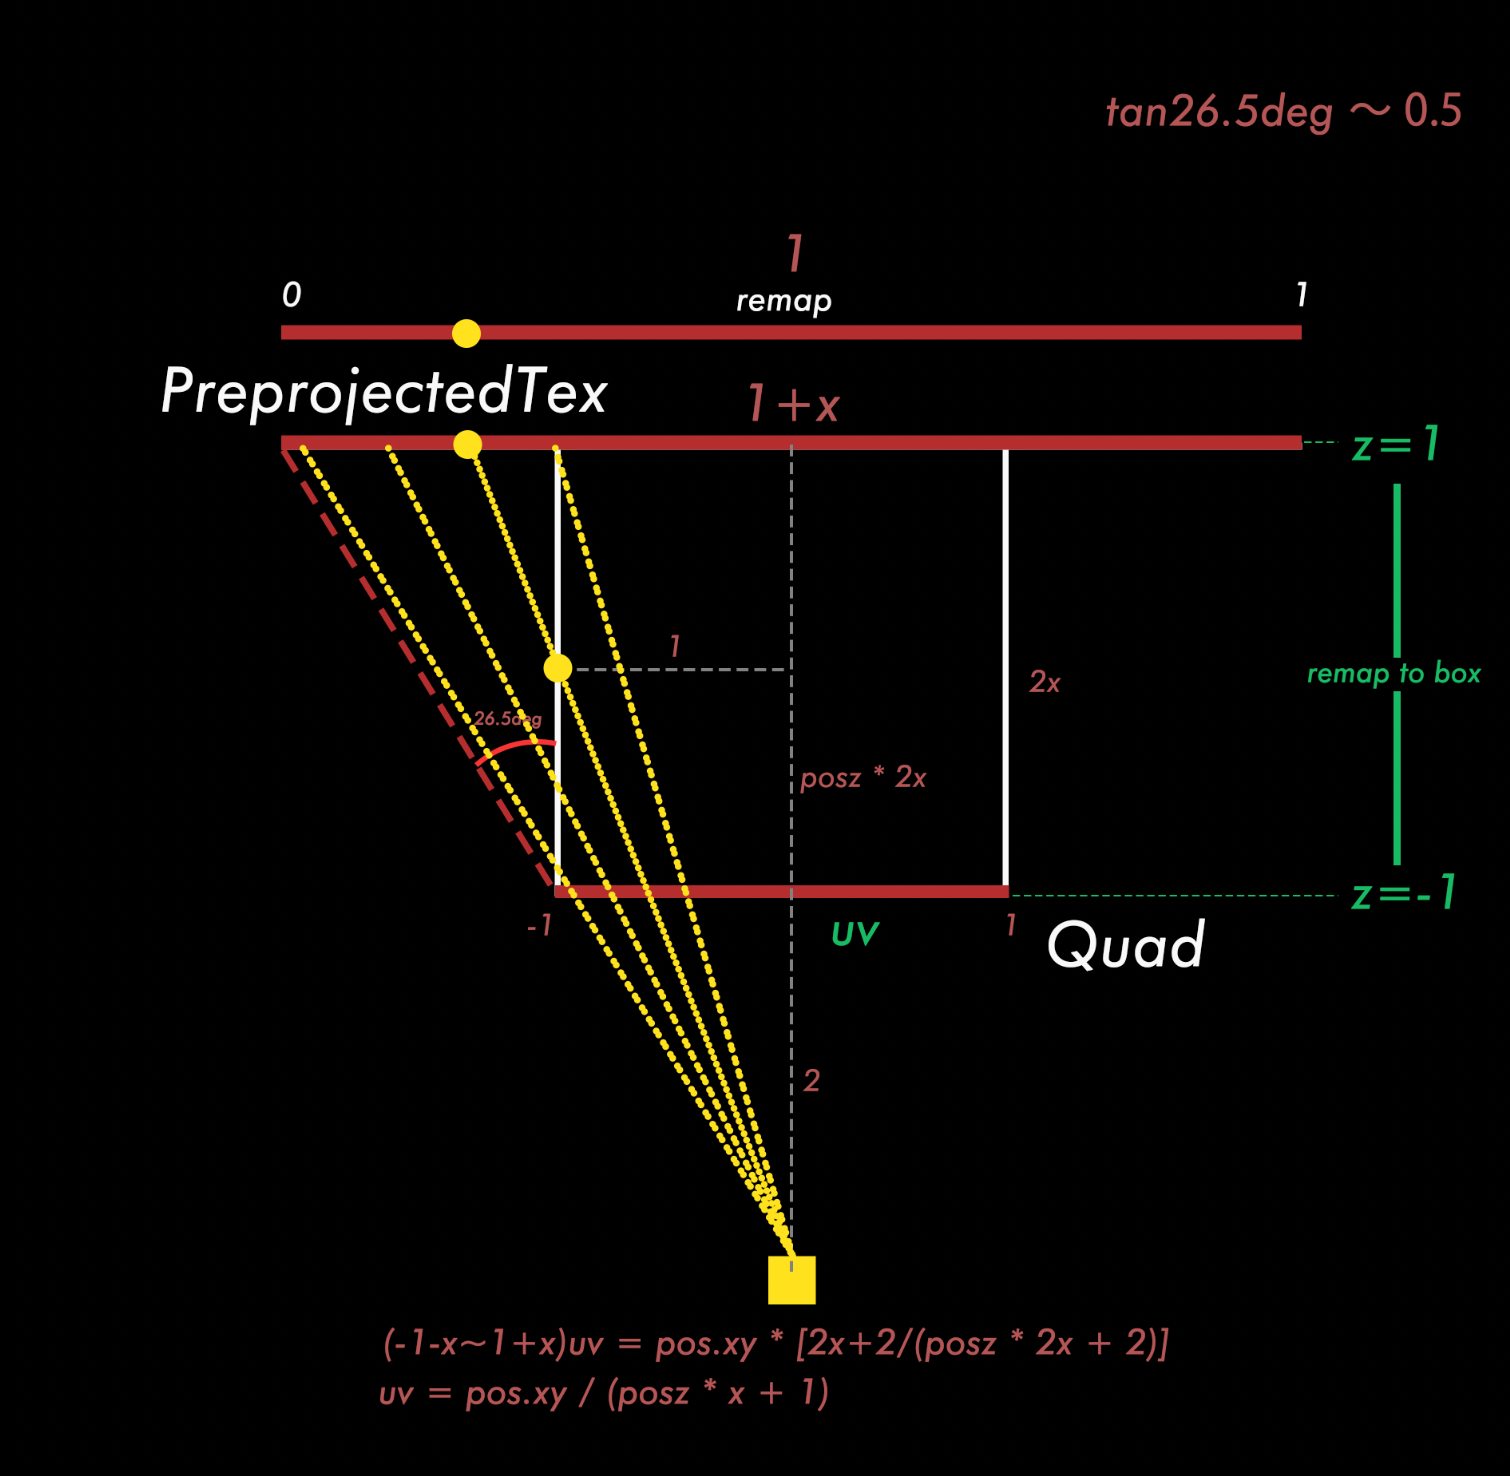 那么在已知需要解决投影变换问题uv其实可以很简单通过相似三角形原理来求得,原来的代码化简之后其实和我现在这一句是一致的,虽然最后还是没有完全理解原代码实现这个过程的脑回路,但是目前这个做法应该是比原来的代码要快上一丝丝的。
 fixed4 frag(v2f i) : SV_Target
                {
                    // room uvs
                    float2 roomUV = frac(i.uv);
                    float2 roomIndexUV = floor(i.uv);
                    float2 n = floor(rand2(roomIndexUV.x + roomIndexUV.y * (roomIndexUV.x + 1)) * _Rooms.xy);
                    roomIndexUV += n;
                    fixed farFrac = _RoomDepth;
                    float depthScale = 1.0 / (1.0 - farFrac) - 1.0;
                    float3 pos = float3(roomUV * 2 - 1, -1);
                    // transform input ray dir from tangent space to normalized box space
                    i.tangentViewDir.z *= -depthScale;
                    float3 id = 1.0 / i.tangentViewDir;
                    float3 k = abs(id) - pos * id;
                    float kMin = min(min(k.x, k.y), k.z);
                    pos += kMin * i.tangentViewDir;
                    float interp = pos.z * 0.5 + 0.5;

                    /* origin code

                    // account for perspective in "room" textures
                    // assumes camera with an fov of 53.13 degrees (atan(0.5))
                    // visual result = transform nonlinear depth back to linear

                    // float realZ = saturate(interp) / depthScale + 1;
                    // interp = 1.0 - (1.0 / realZ);
                    // interp *= depthScale + 1.0;

                    // iterpolate from wall back to near wall
                    //float2 interiorUV = pos.xy * lerp(1.0, farFrac, interp);

                     */

                    float2 interiorUV = pos.xy / (interp * depthScale + 1);

                    interiorUV = interiorUV * 0.5 + 0.5;

                    // sample room atlas texture
                    fixed4 room = tex2D(_RoomTex, (roomIndexUV + interiorUV.xy) / _Rooms);
                    return room;
                }
差不多就是这样~
拍照部分
首先是建立RT的过程,假如我们用new方法,是可行的,RT = new RT(),同时也可以用Gettemporary来新建,读取最后Release掉。这个类似一个RT池,我们在这里拿需要的来用,用完就释放,在HDRP中这个就升级为了RThandle,功能上是类似的,不过我对此没有什么应用场景,所以没怎么用过这个。
官方文档中也提到了
“如果您需要进行一系列后期处理“blit”, 则对于每个 blit,获取和释放一个临时渲染纹理要比 事先获取一到两个渲染纹理并进行重用的性能更好。 这对于移动(基于区块的)和多 GPU 系统来说最为有益:GetTemporary 将在内部执行 DiscardContents 调用, 有助于避免对先前的渲染纹理内容进行代价高昂的恢复操作
大概就是可以设定camera读targetTexture并调用render函数然后new一张jpg(texture2d)通过IO的接口WriteAllBytes实现写入图片中间的ReadPixel是用于读RT/屏幕像素的,这里RT设置成active之后就可以被读到了。我这里涉及到相机组的内容,所以也可以参考一下,它用多的一张RT来作为暂存图。因为RT渲染如果调用自身作为参数好像是不可行的。
 //Final RT
        RenderTexture FinalTex = RenderTexture.GetTemporary((int)(RenderResolution.x * WidthandHeight.x), (int)(RenderResolution.y * WidthandHeight.y), 16, RenderTextureFormat.ARGB32);
        //Temp RT
        RenderTexture nRT = RenderTexture.GetTemporary((int)(RenderResolution.x * WidthandHeight.x), (int)(RenderResolution.y * WidthandHeight.y));
        RenderToParaTexMaterial = new Material(Shader.Find("Unlit/atlasshader"));
        RenderToParaTexMaterial.SetTexture(PreprojectedTex, FinalTex);

        for (int backCameraID = 0; backCameraID < _cameragroup.Count; backCameraID++)
        {
            //Set render uv
            RenderToParaTexMaterial.SetVector(UVInfo,
                new Vector4(camerauvf[backCameraID].x, camerauvf[backCameraID].y, 1.0f / WidthandHeight.x, 1.0f / WidthandHeight.y));
            RenderToParaTexMaterial.SetVector(BAinfo, new Vector3(boundinginfo[backCameraID].x, boundinginfo[backCameraID].y, camerauvf[backCameraID].z));
            //Altas
            Graphics.Blit(_cameragroup[backCameraID].GetthisRT(RenderResolution), nRT, RenderToParaTexMaterial);
            //Copy to FinalTex
            Graphics.Blit(nRT, FinalTex);
        }

        _SaveRenderTexture(FinalTex);
        RenderTexture.ReleaseTemporary(FinalTex);
        RenderTexture.ReleaseTemporary(nRT);
文件保存
以下的代码是将rt这个图保存到文件的方法,利用便捷的`System.IO.File`方法可以很快写出png的内容

    Texture2D png = new Texture2D(rt.width, rt.height, TextureFormat.ARGB32, false);
    png.ReadPixels(new Rect(0, 0, rt.width, rt.height), 0, 0);
    png.Apply();
System.IO.File.WriteAllBytes(path, png.EncodeToPNG());还有另外的一个方法涉及到unity对文件写入类Filestream的管理,在以上的png基础上,加入以下代码,
        byte[] bytes = png.EncodeToPNG();
        FileStream fs = File.Open(path, FileMode.Create);
        BinaryWriter writer = new BinaryWriter(fs);
        writer.Write(bytes);
        writer.Flush();
        writer.Close();
        fs.Close();
这个BinaryWriter类到底是什么呢,摘取一段网上比较好的写法,其实是一个写入/读取器,如果我们不是要写一个文件而是要写很多的话,这个管理起来比上面的写法要更好,初始化的时候就用一个stream来初始化。这个类似文件流的工作方式,是在close或者flush方法执行的时候才会将所有的内容都写入到文件里面,而前者还会把端口关闭。这里两个都写其实也可以不需要。
FileStream 类为我们提供了字节级上的文件读写功能,但开发中我们习惯于对字符串操作。于是 StreamReader 和 StreamWriter 类增强了 FileStream ,它让我们可以在字符串级别上操作文件。可为什么会有 BinaryReader 和 BinaryWriter类呢?因为有的时候我们还是需要在字节级上操作文件,但又不是一个字节一个字节这样去操作,通常是2个、4个或8个字节这样操作,这便有了 BinaryReader和 BinaryWriter 类。它们可以一次读取指定数字的字节,转为字符或数字;也可以将一个字符或数字,按指定数字的字节写入
BinaryWriter
Close作用:释放 System.IO.BinaryWriter 类的当前实例所使用的所有资源。
Write(参数类型 参数名)作用:将值写入当前流。 该函数有18个重载,常用的参数类型有 string,int,byte,float,bool等。
除了这个BinaryReader还有BinaryWriter,
BinaryReader
用特定的编码,将基元数据类型读作二进制值。
Dispose作用:释放 System.IO.BinaryReader 类的当前实例所使用的所有资源。
Close作用:关闭当前阅读器及基础流。
Read(byte [] buffer, int index, int count)用法:从字节数组中的指定点开始,从流中读取指定的字节数,返回类型为 int
const、readonly、static
关于一些常数的make const问题,发现在函数里面去声明一个const(由方法得出)是会报错的,遂发现可以声明一个static readonly关键字,没有static限制的readonly:和static限制的readonly只有一个区别,前者是属于类的常量,后者是属于对象的常量。
static在c#里面可以理解为类的标志而不能被实例化为对象,如果要实例化为对象都为共享的一个数值或者方法,不会随着对象独立改变。
拓展既有的类方法
只需要建立一个static类,在参数前加上this关键字,就可以实现全局的类拓展
public static class camExtension
{
    public static RenderTexture GetthisRT(this Camera cam,Vector2Int RenderResolution )
    {
        //Camera m_Camera = CameraObj.GetComponent<Camera>();
        RenderTexture rt = new RenderTexture(RenderResolution.x, RenderResolution.y, 16);
        cam.targetTexture = rt;
        cam.Render();
        return rt ;
    }
}
判断文件存在
  if(!System.IO.Directory.Exists("Assets/interiormappinig/image")){
            System.IO.Directory.CreateDirectory("Assets/interiormappinig/image");
            print ("Make new folder");
        }
附加:boundingbox获取方法
 protected static Bounds getBound(GameObject model)
{
    Vector3 fakecenter = Vector3.zero;
    CalculatefakeCenter(model, ref fakecenter);
    Bounds resultBounds = new Bounds(fakecenter, Vector3.zero);
    CalculateBounds(model, ref resultBounds);
    return resultBounds;
}

protected static void CalculatefakeCenter(GameObject model, ref Vector3 result)
{
    Renderer renders = model.GetComponentInChildren<Renderer>();
    if(!renders)
    {
        Debug.Log("No renderer in obj,check and recreate the cam");
        return;
    }
    result = renders.bounds.center;
}
protected static void CalculateBounds(GameObject model, ref Bounds resultBounds)
{
    Renderer[] renders = model.GetComponentsInChildren<Renderer>();
    if(renders == null) return;
    foreach (Renderer child in renders)
    {
        resultBounds.Encapsulate(child.bounds);
    }
}
附加一些小知识
- Editor打包的时候也可以放入别的文件夹,只需要名字叫Editor即可
- 然后销毁文件的时候要后往前删除,不然如果是List会有往前进位导致报错的风险
- 在引用shader的时候,如果是只是编辑器中可以使用
Shader.Find但是如果需要打包出来的时候则一定要用参数写入,因为打包检索的时候不会执行这个函数,然后原有的相对路径就会断掉
作者: Ayse
陈疙祚2024-09-01 22:26
陈疙祚:文章真不错http://wap.jst-gpmx.cn/news/25469.html
niaohrbmjl2024-11-22 09:25
《来来往往》国产剧高清在线免费观看:https://www.jgz518.com/xingkong/30837.html
ztegnkdqmo2024-11-22 14:18
《穿越王妃不好惹》短片剧高清在线免费观看:https://www.jgz518.com/xingkong/40856.html
zczmoivioe2024-11-30 07:49
《压力之下:美国女足世界杯队》记录片高清在线免费观看:https://www.jgz518.com/xingkong/20551.html
cyhalrjheb2024-12-07 23:47
《陪护一小时》剧情片高清在线免费观看:https://www.jgz518.com/xingkong/47418.html